Custom Firmware for my Lamps
electronics home_automation ESP32 
Overview
A few years ago I bought two Xiaomi Mi Desklamps from Walmart.com. I was just starting to get into smart home things, and I had a couple of google home minis and wanted some more devices to play with. I bought the desk lamps because I thought they were aestheticall pleasing, I liked the adjustable brightness and color temperature features, and I was excited to play with controlling them via my Google Home-based home automation setup. I thought I could make some easy automations like automatically setting the color temperature based on the time of day or making sure they automatically turn themselves off late at night to save energy.
I enjoyed playing with them, and they are good lamps, but a few years later when I got more privacy conscious, I liked the fact that these relied on Xiaomi and Google’s clouds less and less. Fast forward to 2023, when I migrated my entire smart home system to a locally hosted Home Assistant instance. At this point, all of my Z-wave and Zigbee devices have been migrated from a Samsung SmartThings controller to my own private home server. I use two USB radio dongles, one for Z-wave and one for Zigbee, to bridge my Z-wave and Zigbee devices to MQTT, which is then exposed to Home Assistant. This way, no matter what physical network my devices are on, they all show up in Home Assistant as MQTT devices. I wanted to do the same thing with my Xiaomi lamps, which were the last pieces of my home automation infrastructure that still relied on the cloud.
Enter ESPHome. ESPHome is an open-source firmware project for ESP32 and ESP8622-based devices. The user can configure and build the firmware using a configuration file written in YAML and flash the resulting ESPHome firmware image to an ESP-based device. As luck would have it, I am not the first person to want to put ESPHome on one of these Xiaomi lamps. I followed a very helpful guide by Zry.IO. The author’s name does not appear on the About page for the blog, but it does state that he or she is a privacy-first smart home enthusiast, so I guess that is not too surprising.
Hardware
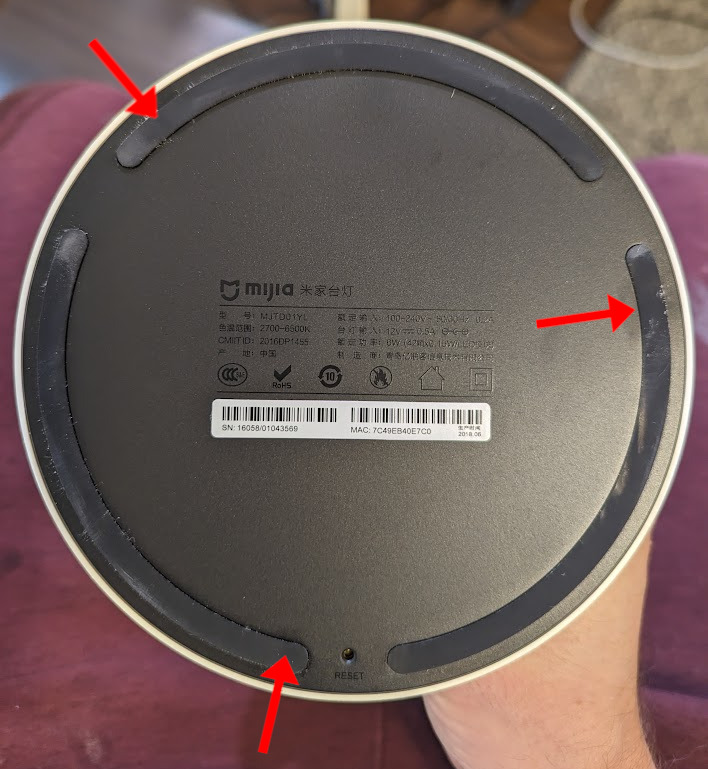
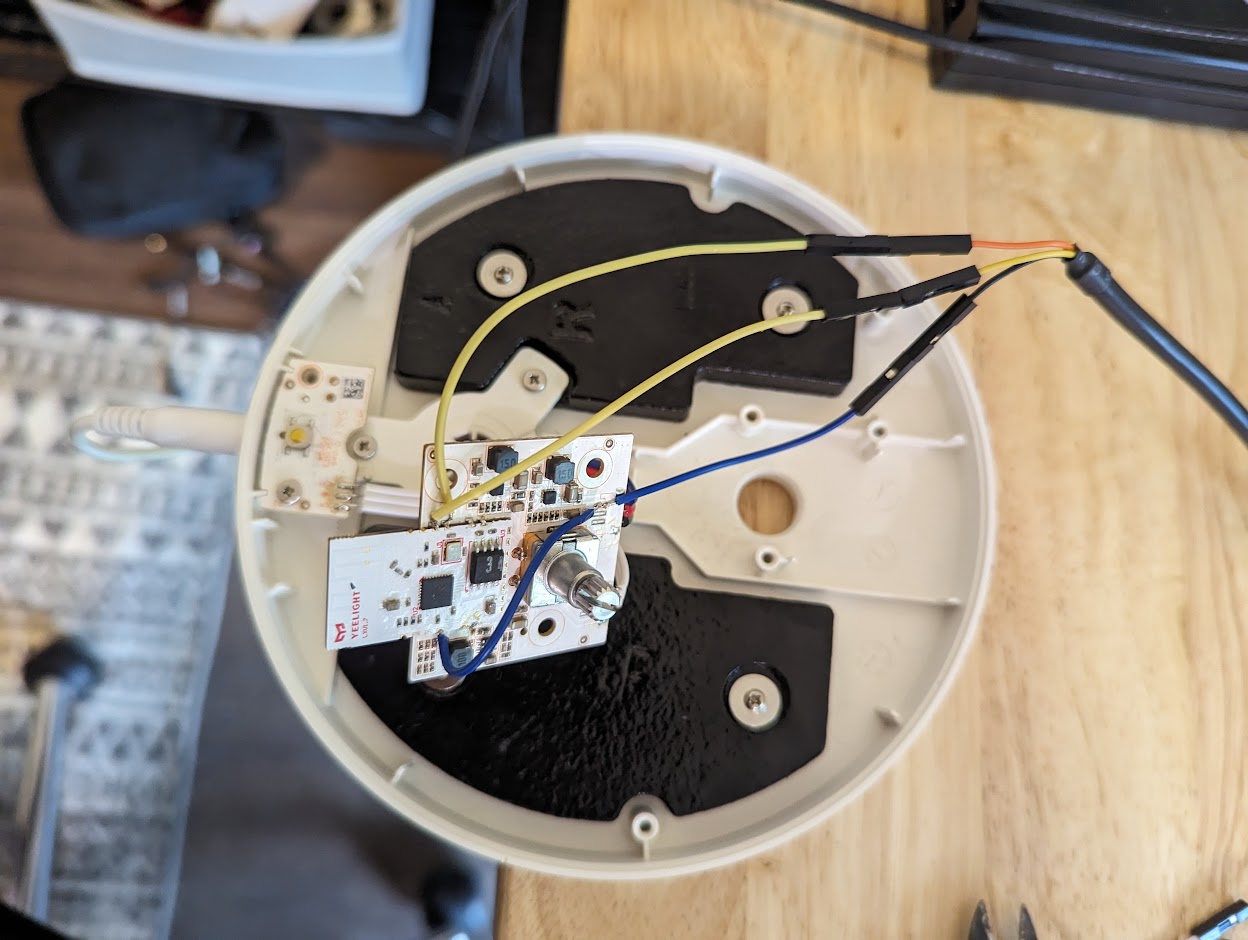
I started by opening up the base of the lamp. Underneath the adhesive rubber strips are three screws.
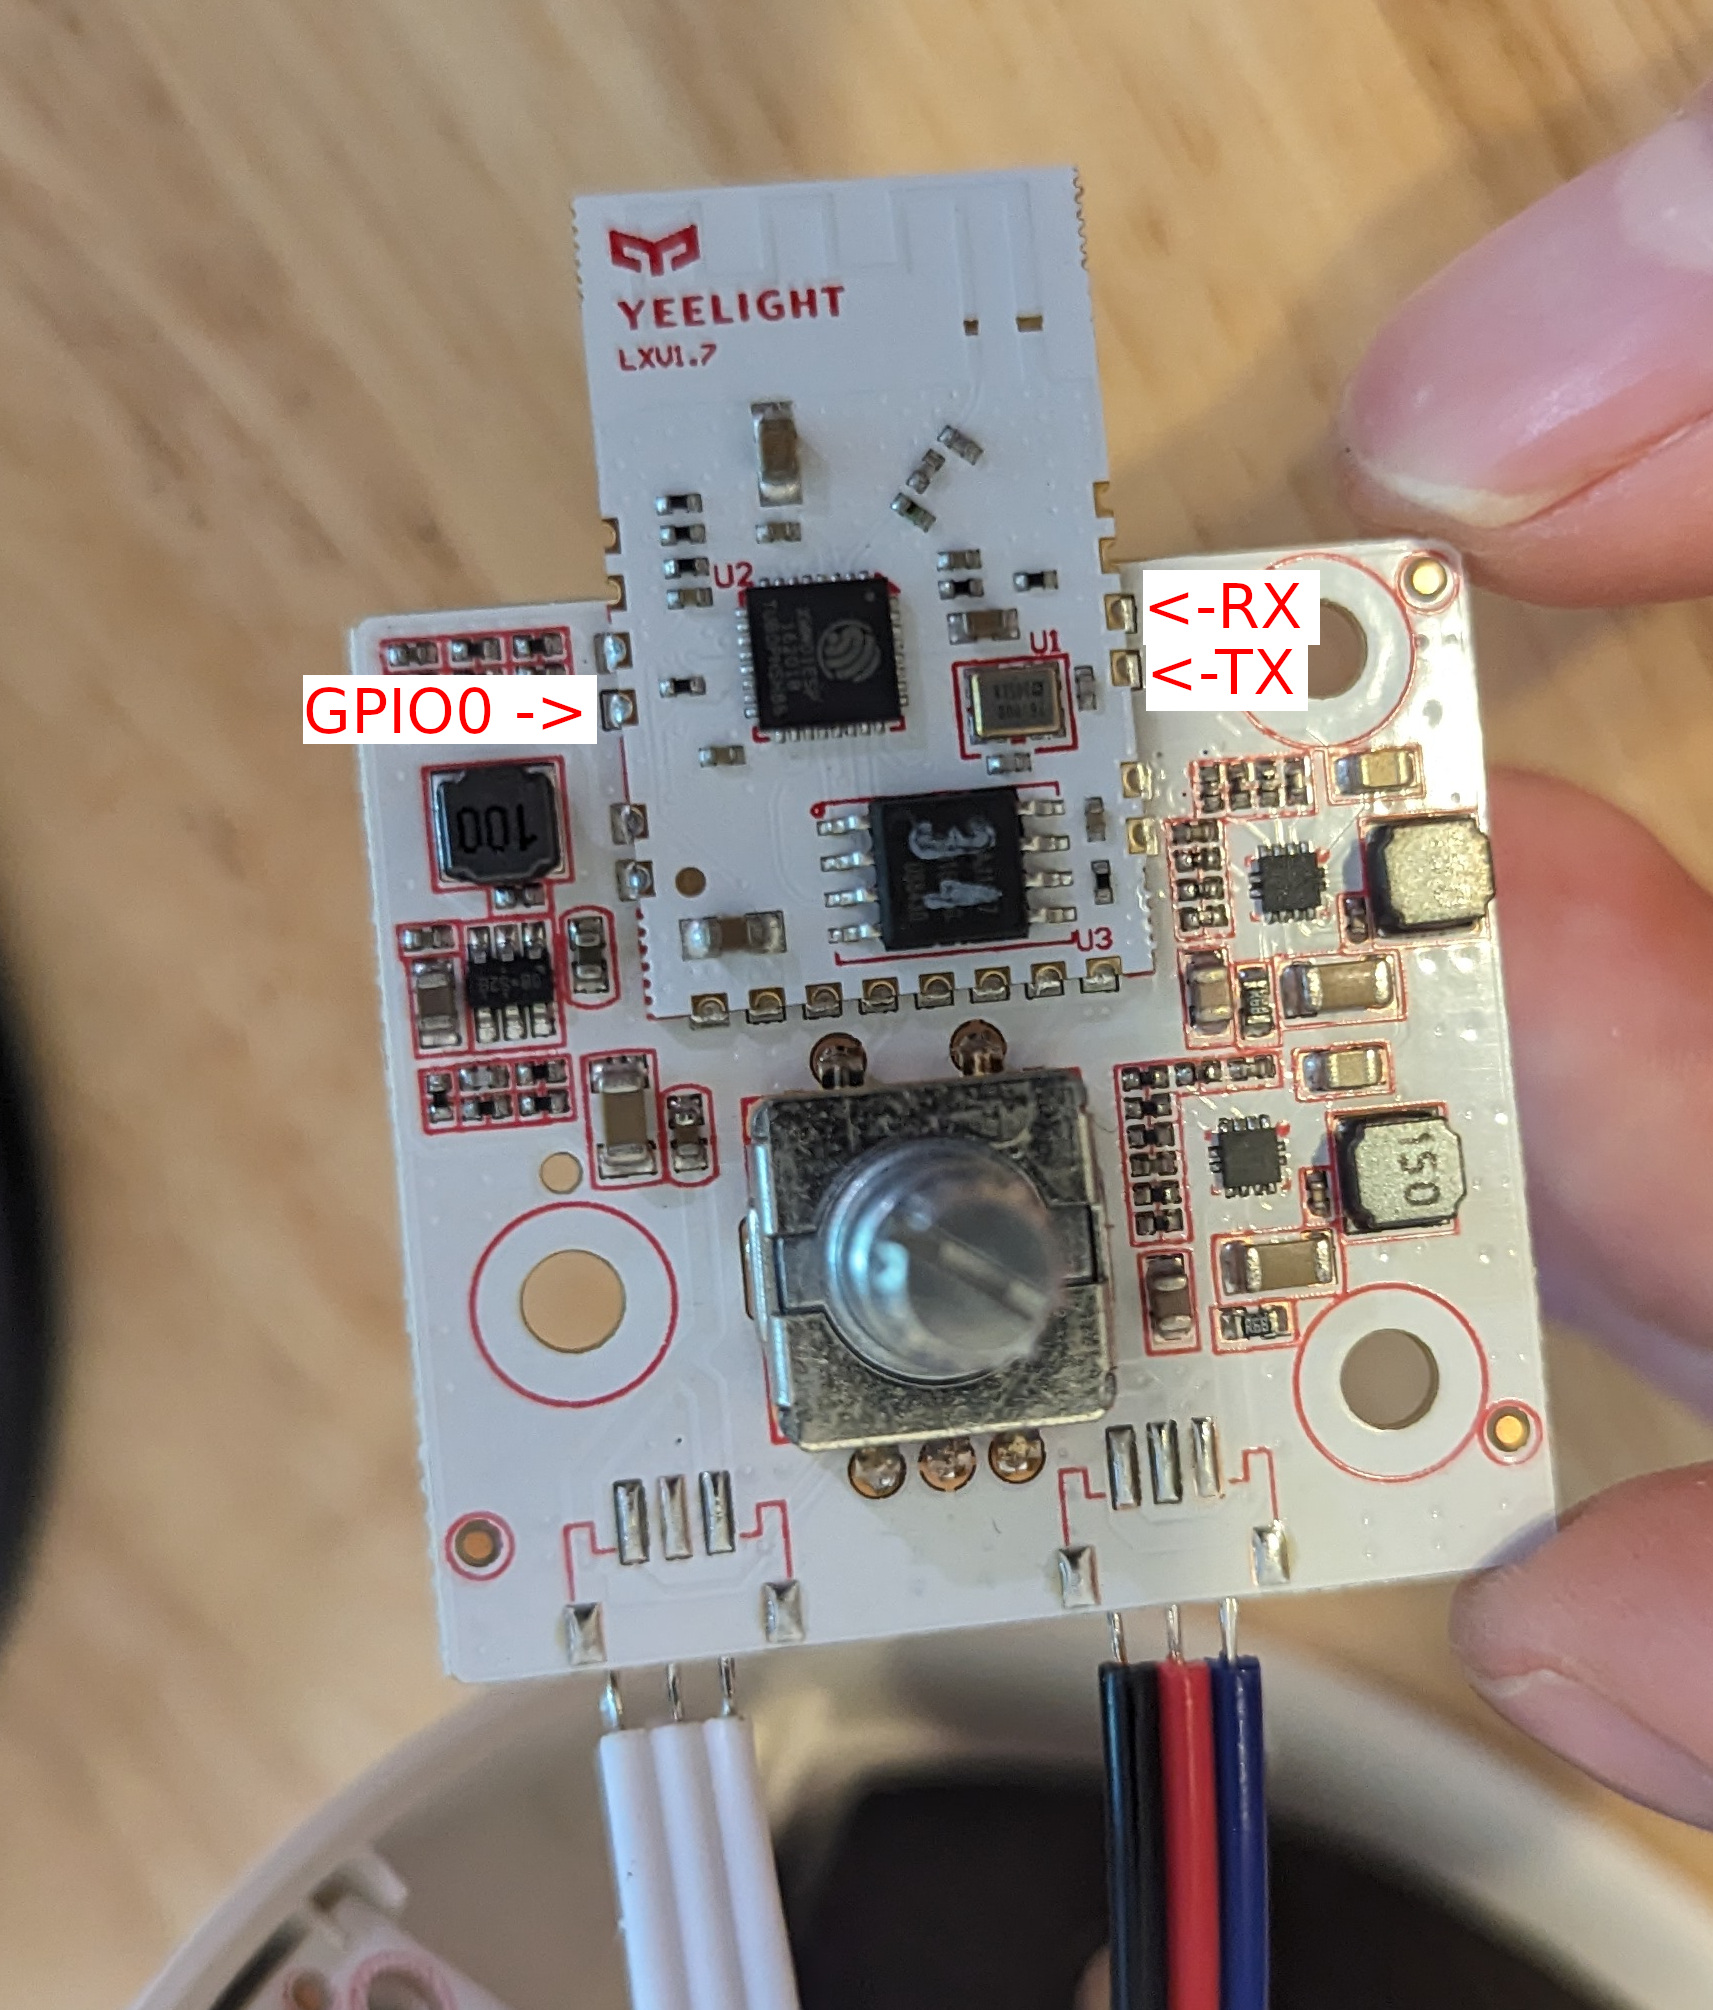
 The main PCB is held on with three more screws. Removing the three screws and the knob on the rotary encoder frees the main PCB. To program the ESP8266 with ESPHome, we need to connect to the UART, and connect GPIO0 to ground to set the boot mode. Luckily, soldering wires to the castillated edges of the ESP8266 module is not too difficult, and the pin out has already been worked out by Zry.IO and others.

Software
ESPHome is a configurable firmware that is built based on a configuration YAML file. Here is the contents of the YAML file that I used (based on the one from Zry.IO). The only modifications I had to make for the Wifi and MQTT setup.
1
2
3
4
5
6
7
8
9
10
11
12
13
14
15
16
17
18
19
20
21
22
23
24
25
26
27
28
29
30
31
32
33
34
35
36
37
38
39
40
41
42
43
44
45
46
47
48
49
50
51
52
53
54
55
56
57
58
59
60
61
62
63
64
65
66
67
68
69
70
71
72
73
74
75
76
77
78
79
80
81
82
83
84
85
86
87
88
89
90
91
92
93
94
95
96
97
98
99
100
101
102
103
104
105
106
107
108
109
110
111
112
113
114
115
116
117
118
119
120
121
122
123
124
125
126
127
128
129
130
131
132
133
134
135
136
137
138
139
140
141
142
143
144
145
146
147
148
substitutions:
  default_color_temperature: '333.3'  # (default color temperature, adjust as needed, unit is  mireds (https://en.wikipedia.org/wiki/Mired) (1000000 / 3000 K ≈ 333.3 mireds)

esphome:
  name: lamp
  comment: 'Xiaomi Mijia Desk Lamp (MJTD01YL)'

esp8266:
  board: esp01_1m  # 1 MB Flash Memory (there is really a 2MB chip installed)
  restore_from_flash: true

logger:
  level: WARN
  baud_rate: 115200

wifi:
  fast_connect: true
  networks:
    - ssid: gazorpazorpfield
      bssid: 94:A6:7E:00:80:AC # MAC address of 2.4GHz access point
      password: redacted

mqtt:
  broker: 192.168.1.10
  port: 1883
  username: dan
  password: redacted
  discovery_unique_id_generator: mac # This is very important if you are using the config for multiple devices
ota:
  password: esphome

button:
  # Reset Button
  - platform: restart
    id: restart_button
    name: 'Restart Lamp'
    entity_category: diagnostic

globals:
  - id: color_temperature
    type: float
    restore_value: no
    initial_value: ${default_color_temperature}

sensor:
  - platform: rotary_encoder
    id: rotation
    pin_a: 13
    pin_b: 12
    resolution: 2
    on_value:
      then:
        - if:
            condition:
              # Check if the knob is pressed while you turn it
              lambda: 'return id(rotary_encoder_button).state;'
            then:
              # The knob is pressed, adjust color temperature
              - lambda: |-
                  auto min_temp = id(light_).get_traits().get_min_mireds();
                  auto max_temp = id(light_).get_traits().get_max_mireds();
                  auto cur_temp = id(light_).current_values.get_color_temperature();
                  id(color_temperature) = max(min_temp, min(max_temp, cur_temp + (x * 10)));
                  auto call = id(light_).turn_on();
                  call.set_color_temperature(id(color_temperature));
                  call.perform();
            else:
              # The knob is not pressed, adjust brightness
              - light.dim_relative:
                  id: light_
                  relative_brightness: !lambda 'return x / 25.0;'
        # Reset encoder position to zero
        - sensor.rotary_encoder.set_value:
            id: rotation
            value: 0
    internal: true

binary_sensor:
  - platform: gpio
    id: rotary_encoder_button
    pin:
      number: 2
      inverted: true
    on_multi_click:
      # Double click knob to reset color temperature to default
      - timing:
          - ON for at most 1s
          - OFF for at most 1s
          - ON for at most 1s
          - OFF for at least 0.2s
        then:
          - lambda: |-
              id(color_temperature) = ${default_color_temperature};
              auto call = id(light_).turn_on();
              call.set_color_temperature(id(color_temperature));
              call.set_transition_length(500);  // Adjust transition length as needed
              call.perform();
      # Click to toggle light
      - timing:
          - ON for at most 1s
          - OFF for at least 0.5s
        then:
          - light.toggle:
              id: light_
              transition_length: 0.5s  # Adjust transition length as needed
    internal: true

  # Use the built-in reset button as a hard reset button
  - platform: gpio
    id: reset_button
    pin:
      number: 14
      inverted: true
    internal: true
    on_release:
      then:
        - button.press: restart_button

output:
  # cool white channel
  - platform: esp8266_pwm
    id: output_cold
    pin: 4
  # warm white channel
  - platform: esp8266_pwm
    id: output_warm
    pin: 5

light:
  - platform: cwww
    id: light_
    name: 'Desk Lamp'
    icon: mdi:desk-lamp
    cold_white: output_cold
    warm_white: output_warm
    cold_white_color_temperature: 6500 K
    warm_white_color_temperature: 2700 K
    default_transition_length: 0s
    constant_brightness: true
    gamma_correct: 0
    on_turn_on:
      - light.control:
          id: light_
          state: on
          color_temperature: !lambda 'return id(color_temperature);'
    on_turn_off:
      - lambda: 'id(color_temperature) = id(light_).current_values.get_color_temperature();'
    restore_mode: RESTORE_DEFAULT_OFF
I followed the instructions here to install ESPhome and set up a Python virtual environment. It all went smoothly, but I had to do it twice, because I realized that I gave the second lamp the same name as the first (just lamp), and this caused Home Assistant to think it was the same entity. Apparently, when using ESPHome, multiple instances of the same device must have unique names, and this is not guaranteed when using the same YAML file for multiple devices. This ended up being a HUGE pain in the ass. I think what eventually solved it was renaming the devices, changing the configs to include discovery_unique_id_generator: mac under mqtt:, cleaning the old mqtt discovery topics using esphome mqtt-clean, and restarting home assistant. I think home assistant was getting freaked out about two entities with the same unique id. I wouldn’t have been able to figure this out without the awesome tool MQTT Explorer.

Conclusion
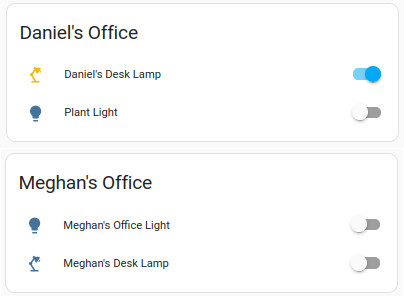
Finally, I have my Xiaomi lamps in my Home Assistant dashboard. All this work gave me complete control over my devices, without involving the cloud at all. In addition to the added privacy, I also get a lot lower latency with this setup. Before, if I wanted to use my phone to turn off my lamp, the command would have to go from my phone, to google’s cloud (for controle via google home), to Xiaomi’s cloud (possibly to China), and finally back to my LAN and to my lamp. Now, the command does not leave my LAN, and when I am out and about I can still access my LAN via Tailscale on my phone. Would I recommend this to just anyone? No. But if you find joy in the process, and you like tinkering, it’s definitely worth it.